
- Screwdriver
- Dustpan and brush
- Dryer vent cleaner kit [prices from $7.95 on Amazon]
- Washing up liquid and sponge
- Mask, gloves, and old clothes
- Vacuum cleaner with a crevice attachment
- Power drill (optional)
- An extra pair of hands to lift the dryer
Learning to clean a dryer vent is worth the effort to speed up the laundry process. Let’s face it - the laundry can be a chore, but a little routine maintenance helps you fast-track your way to perfectly dry clothes. If that’s not motivation enough, this simple task can save you money on your energy bills. On the other hand, neglecting your dryer vent can lead to clogs, increasing the risk of overheating and even fire.
If you’ve invested in one of the best dryers, you’ll want to keep it in top condition so it performs at its best. Vented dryers extract moisture and allow it to exit the house through a vent or tube. When you dry clothes, lint naturally accumulates. While the lint trap inside the door catches most of it, inevitably, some lint sneaks past, leading to clogs in the vent. These blockages restrict airflow and pose a fire hazard, as lint is highly flammable.
Thankfully, learning how to clean a dryer vent is pretty straightforward. It’s possible to tackle it yourself and save the cash of hiring a contractor. We’ll guide you through step by step to give you the confidence to do the job yourself. It’s worth digging out your manual for specific instructions for your model. One of the best vacuum cleaners will lightly clear the debris.
It’s wise to include cleaning the dryer vent in your routine home maintenance. Once a year should be sufficient for most households; keeping on top of it can save you the hassle of dealing with an urgent repair job at an inconvenient time.
How to clean a dryer vent: Quick steps
- Prepare for a messy job
- Unplug the dryer and move it out from the wall
- Disconnect the vent
- Remove and clean the outside vent cover
- Brush and vacuum the vent from the outside
- Brush and vacuum the vent from the inside
- Vacuum the surrounding area
- Reconnect the vent
- Plug in and test
How to clean a dryer vent: Step by step guide
1. Prepare for a messy job
Before you begin, be warned you’ll probably uncover a lot of dust. We recommend wearing old clothes, a mask and gloves. Gather your tools so they’re within easy reach.
2. Unplug the dryer and move it out from the wall

Once you’re ready, unplug the dryer to avoid getting a nasty shock. If you have a gas model, you’ll need to turn off the supply while taking extra care to avoid accidentally dislodging the line. If in doubt, it’s best to consult a pro.
You’ll need to carefully move the dryer away from the wall so you can access the vent at the back of the machine. Enlist the help of a friend or family member if it’s heavy to reduce the risk of injury.
3. Disconnect the vent
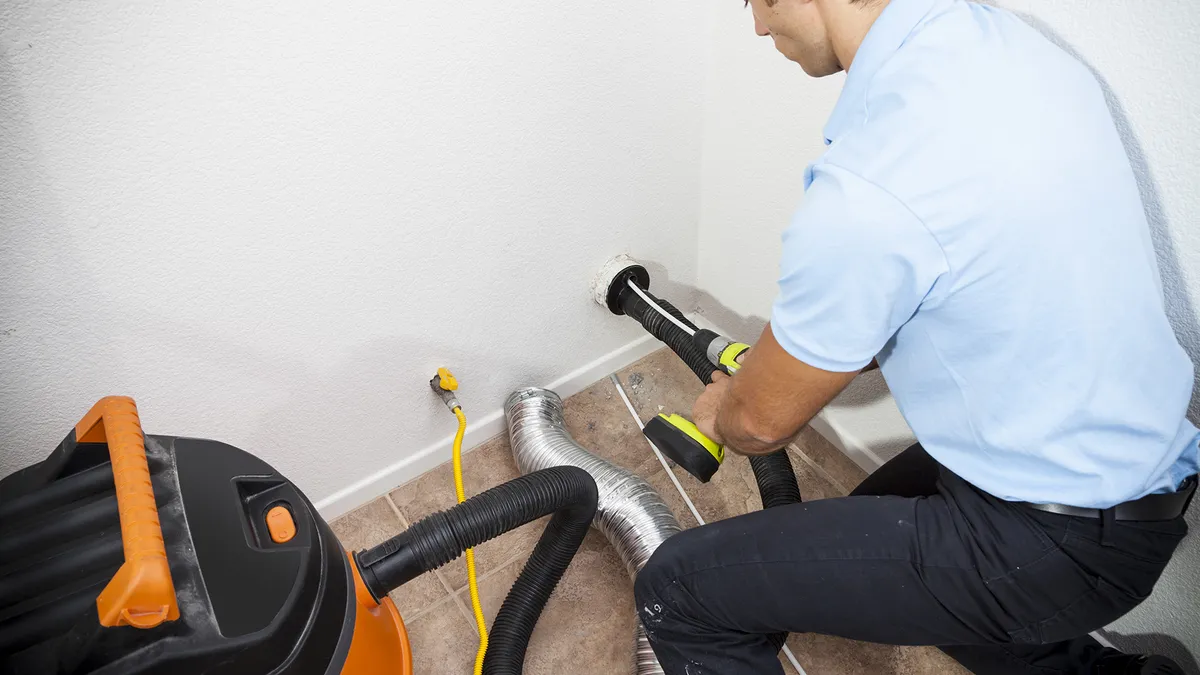
Next, disconnect the vent or tube from the machine and the wall. If it’s fastened with screws, you’ll need a trusty screwdriver for this step.
4. Remove and clean the outside vent cover
Locate where the vent exits outside the house - you should see a vent cover. Remove the vent cover using a screwdriver.
Take this opportunity to wash the cover in warm, soapy water and leave it to dry thoroughly. A clean cover maximizes airflow and enhances performance.
Check there are no obstacles to the vent - you may need to prune any shrubbery blocking the exit.
5. Brush and vacuum the vent from the outside
Our pro tip is to clean the vent from wherever it’s highest so that gravity lends a helping hand with dislodging debris. Typically, that’s outside, though tackle the job from the inside first if it’s the opposite way around in your home.
Take the round brush from your dryer vent cleaning kit and insert it into the vent from the outside. Rotate it and move it up and down to loosen dirt. Some kits recommend attaching a power drill to level up that spinning motion. Follow the instructions for yours.
Once the debris is loose, clear hard-to-reach spots with your vacuum cleaner and the crevice attachment.
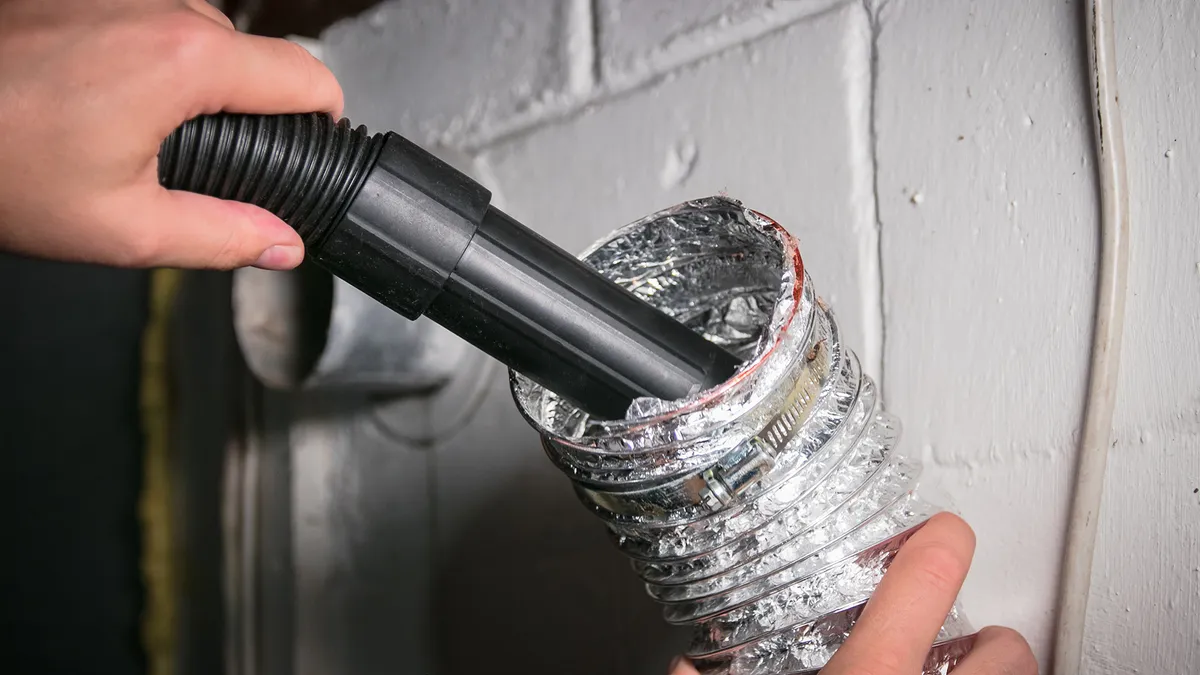
6. Brush and vacuum the vent from the inside

It’s the same drill as earlier - but this time from the inside. For a thorough clean, remember to tackle the inside of the exhaust pipe and the back of the vent on your dryer.
Insert the brush into the vent to loosen the lint before vacuuming.
7. Vacuum the surrounding area
While your dryer is away from the wall, take advantage of the opportunity to spruce up the surrounding area. Use a dustpan and brush or your vacuum to achieve a spotless finish. Lint has a habit of sneaking into the dryer, so this can minimize the chances of annoying clogs.
8. Reconnect the vent
Once you’ve cleared the debris, it’s time to reconnect the vent. Don’t forget to replace the external vent cover once it’s dry.
9. Plug in and test
Finally, lift the dryer back into place. Plug in your appliance. If it’s a gas model, turn the valve back on.
Test that everything’s connected by programming an air or fluff cycle for ten minutes. Once that’s done, your dryer will be ready to make short work of your laundry.
How to clean dryer vent ducts: Step by step guide
Cleaning dryer vent ducts is a relatively easy process that will benefit your dryer greatly. Follow these steps to ensure your dryer vent duct is clean so that your dryer runs at maximum efficiency.
1. Remove the lint trap
Take out your dryer's lint trap and remove any visible lint.
2. Clean the outside of the dryer duct
Use the lint brush and vacuum cleaner to clean the outside of your dryer duct.
3. Vacuum inside the dryer duct
Clean the inside of the dryer duct using the lint brush and vacuum cleaner. Try to get as much lint and dust as possible. If the inside of the dryer has hard clumps of lint, use a stiff-bristled brush to loosen them before vacuuming.
4. Reconnect the duct
Using your screwdriver, reconnect the duct to the dryer. If it is loose, use some duct tape to secure it.
5. Test your dryer
Test your dryer to ensure there is adequate airflow. If the problems persist, then there could be some faulty components in your dryer that will need to be replaced. Consult a professional to diagnose the issue.

"Keeping your dryer vent ducts clean is crucial not only for the efficiency of your dryer but also for the safety of your home. It's essential to be aware of warning signs that your dryer vent ducts may need cleaning. If your dryer takes longer than usual to dry clothes, there is a musty odor, or the dryer is overheating, it may be time to clean the ducts."
You should clean your vent duct and lint trap regularly to avoid buildup or germs. Every 6-12 months is ideal, but if there are any foul odors or if your dryer isn't working properly, you should clean it sooner.
Shorten your dryer duct. The longer your dryer duct, the more likely it is to build up lint and dust. Making it shorter makes it easier to clean and cuts down on clumps.
If you're not confident taking apart your dryer or worried about any part of the cleaning process, call a professional to avoid damaging your machine or yourself.
FAQs
How often should a dryer vent be cleaned?
How often you should clean your dryer vent depends on your household. We recommend tackling the job once a year at a minimum. Consider upping it to twice yearly to avoid clogs if you have a large household or furry friends.
Staying on top of cleaning your dryer vent helps you dry clothes more efficiently while saving on energy bills. If you don’t do it regularly, the lint build-up can lead to overheating, posing a fire risk. According to The Home Depot, clogged dryers cause 1000s of fires annually in the US.
If your dryer vent becomes clogged, it’s best to tackle it straightaway for safety reasons.
How often do you need to clean dryer vent ducts?
As a general rule of thumb, cleaning your dryer vent ducts every 6-12 months is smart. Regular cleaning is essential to prevent potential hazards. If your dryer takes longer than usual to dry your clothes or if there is a musty odor, you may want to clean it more urgently. It's crucial to prioritize properly cleaning your dryer vent ducts to ensure your dryer will function efficiently.
How do I know if my dryer vent is clogged?
It may become clogged if you don’t stay on top of cleaning your dryer vent. Here are the telltale signs:
- Drying your clothes takes longer than usual - you may need to resort to multiple cycles.
- The machine is hot after use.
- Your clothes are hot after a cycle.
- You can smell burning.
- You notice an excessive build-up of lint around the dryer.
If any of these sound familiar, your dryer needs urgent attention. Cleaning the vent should address the issue, though call out a pro if the problems persist.
How do I keep my dryer vent from clogging?
While it’s impossible to completely prevent clogging, a few simple actions can minimize the chance of it happening.
Every time you dry laundry, remove lint caught in the lint trap. The secret is to do this before you run a cycle to reap the benefits of more efficient drying. Another tip is to go easy on the dryer sheets - these can cause blockages.
Of course, keeping the dryer vent clean can also reduce the chance of clogs.
How to clean a dryer lint trap
Lint is made of clothes fibers that come off during the washing and drying process. The lint trap or filter collects this lint to prevent it from getting into the vent.
The location of your lint trap will vary depending on the dryer manufacturer, but they’re usually in an accessible spot, like just inside the door or on top of the dryer. Check your manual for specific location and cleaning instructions for your model.
The lint trap is a mesh filter screen that usually pulls easily out of a slot in the dryer. Any lint collected on the screen can be removed by hand. The best practice is to do this after every load. But for a more thorough clean, you can gently vacuum it using a brush attachment on your vacuum.
Before putting the screen back into the slot, periodically check for lint accumulated inside, and if necessary, use a long attachment on your vacuum to remove it.
Final thoughts
While it may seem like a chore, cleaning your dryer vent is a surprisingly straightforward and satisfying job to tackle yourself.
A little routine maintenance goes a long way in making laundry - and your life - easier.

